Saturday, June 23, 2007

MAKING THE BACK GRAFT

I save most of my off cuts in two groups; Big scrap and small scrap. The bigger stuff I try and reuse to make other parts, the smaller stuff works well for cauls, push sticks, patches etc.

The back patch was made from an offcut from the bottom segment of the heel stack. I was a very nice piece of quatersawn mahogany about 3"x4"1/2", and as it already had one nicely planed flat face, it only needed little preparation to be made in to two back patches.

I started off by truing the sides and edges on the shooting board. Then the rough face was cleaned up and thickness to 10mm, cut into four 7/8" wide segments and glued together into one 12" long cross grained stick.

After the glue had set overnight, I ran the stick trough my bandsaw twice
, but before the second cut I planed off all the saw marks on the stock. This gave me three 1/8" thick segments, planed on one side and rough on the other. In the end the three segments were glued into one 36" long graft. The back graft for this build only needed to be about 14-15" long which left me a spare one ready for my next build - in 2053...

I used double sided stickytape to secure the thin graft on the bench for the final planing. I started off without, but quickly learned the danger in this, as the thin and fragile graft broke from bending upwards once the plane bit into it. One would have thought I would have learned my lesson from planing the sides, but apparently not.

Last, the two grafts were jointed to final width. The one for this build was planed down to 20mm, whereas the other one was left at full width.


HEEL SCRAP

TRUING THE HEEL SCRAP

PLANING STOCK TO THICKNESS

CUTTING SEGMENTS

GLUING SEGMENTS

PREP PLANING FOR SECOND CUT

RIPPING PATCH PIECES

GLUING PATCH PIECES

FINAL THICKNESS PLANING

JOINTING THE GRAFTS

THE FINISHED BACK GRAFTS


Wednesday, June 13, 2007

MAKING KERFED LININGS

The rough linings were originally cut when I initially resawed of the lumber. They were sawn from leftovers of the mahogany neck stock - 32" long 3/4" wide and a fat 5/16" thick. Each lining strip had already been planed on one side.

The first thing I set out to do was to plane them in pairs to a final width of 15mm, just shy of 5/8", by clamping them on to my shooting board, one on top of the other, and straightening them in the process as well. Each of them had a slight crook in them, but I can't remember if that was already there before they were cut or something they developed later.

Then the lining strips received a 45º bevel plane by sticking them on the shooting board with double sided tape and
planing them with my block plane, using the step for support while leaning the plane up against the linings. I used my newly acquired 38º blade for this, first on a very coarse setting gradually retracting the blade to a fine setting as I got closer to the desired bevel that left a 1/16" edge on the top.

Then the linings were planed in pair to final thickness, 6mm for the bottom linings and 6.5mm for the top ones using a double sided sticky tape and a bench dog as stop. It would probably have been more logical to do this step before adding the bevel, but that was the way I ended up going about it.

Last the kerfing was cut.
This operation was also executed with the linings in pairs, with the end of the linings taped together with blue tape to keep them aligned at all times. I started out having the saw exit on the bevel side of the linings, but soon realized that it gave a must cleaner result when I turned the linings around having the cut exit at the square end. I used a fine dovetail saw and the little miter box I made for the rosette tile cutting. The saw is a Lie-Nielsen straight handle rip saw and it has a very thin blade and is set with a narrow kerf, which made it necessary to cut the kerfing in 4mm increments to allow the linings enough flexibility to be bend around the waist. I chose the rip saw, as opposed to a cross cut saw, as it leaves a flat bottom in the cut.

I attached a little piece of maple
inside the miter box as a guide for cutting the kerfing to an even width. I also made a depth stop for the saw from some maple scrap that I clamped on its side with three plastic spring clamps, leaving about 1/32" of the linings uncut.

The new 38
º and 50ºblades I got for my block plane has turned this little workhorse into a small wonder in itself. I know Lee Valley also makes a toothed blade for their block planes now and after the success I had with its bigger brother I think this blade is going to be added to my wish list of future purchases.


BLOCK PLANE BLADES

JOINTING LININGS

PLANING LINING BEVELS
KERFING PROFILE

PLANING LININGS TO FINAL THICKNESS

CUTTING THE KERFING

THE FINISHED KERFED LININGS

KERFING CLOSE-UP


PREPARING THE SIDES

After recovering from the aches and pains in my body caused by the back planing, I decided to try another way to plane the sides.

When I initially got my 50º blade for the Lee Valley Jack/Smoother combo, I also ordered a toothed blade which I have never used, mostly because it was honed to a 40º angle rather than the 38º angled specified on their web site. I did start to hone it to the lower angle when I first got it, but it took me forever on my water stones and I kept having to flatten them and it was all a pain in the butt. Now that I had acquired an extra coarse diamond stone, I thought I would give a go once again.

It still took me some time and effort to get the new bevel on as well as lapping the face but I eventually got there. I slid it into my jack plane while the smoother got outfitted with the regular but steeper 50º blade.

First I set out to plane all the saw marks off with the smoother. I put one of the sides on the bench unclamped, just using a bench dog as a stop and started to plane away, but I soon realized the potential danger of this as the side suddenly bent violently up in the air and slapped down on to the bench with a loud 'smack' as the blade bit into the surface. Luckily no harm was done but I'm not so sure the outcome wouldn't have been different, had I been planing some curly something. I'll try to remember not to do that again in the future. I proceeded with one end clamped to the bench with a caul and planed away from that. Though this was a bit of a pain as I had to unclamp and rotate the side all the time, in order to thin the full length of the side, it was definitely safer way to do it and I eventually got it all smooth and free from saw marks.

Once the saw marks were gone I decided on which face would go on the outside and marked these with the position of the neck joint, waist and end as well as arrows for which edge would be joint to the top. Each side was also got marked 'A' and 'B' accordingly and so was each corresponding heel slot on the neck block. The sides were now ready for further thicknessing on the inside face.

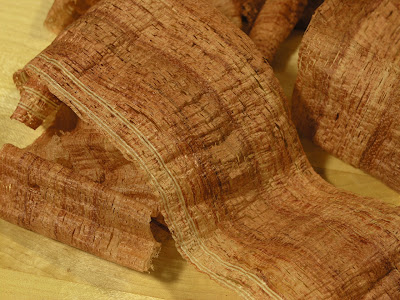
Finally I got to try out the toothed blade and what a difference it made. It was so much easier to drive through the work and it left a wonderful bundle of frizzy curls. The clean up of all the tooth marks with the regular blade in the smoother was equally effortless. Every time I had completed a full circle of planing; toothed planing, regular planing at both ends, I measured the thickness of the side and marked the shallow spots with a white pencil and planed the next circle accordingly.

Eventually I got down to a thickness off 2.1-2.2mm (~0.082-0.086") with the heel slot ends slightly thicker than that, to accommodate the slightly wider heel slots.

Last,
all four edges were jointed true and square on my shooting board

TOOTHED BLADE AND REGULAR 50º BLADE

PLANING SIDES

TOOTHED BLADE GROOVES

TOOTHED BLADE GROOVES CLOSE-UP

TOOTHED BLADE SHAVINGS

MEASURING THICKNESS

JOINTING SIDE EDGES

JOINTING SIDE ENDS

Wednesday, June 06, 2007

PREPARING THE BACK


PART 2.

Over the weekend I did some prepping for this part of the job. As my bench top wasn't really flat I made the effort to make it so by planing it with my Bevel-Up Jack plane and refinished it with "The Good Stuff".

The planing of the back went fine but boy was it tough to do. 100 push-ups... piece a' cake; Planing 1mm of a plate of bubinga is another matter.
If I was to do this for a living I might be able to run for Governor of California someday. I never thought I would say this, but sharpening my plane blade and measuring was welcome interruptions to this herculean task.

If anybody who hasn't tried to thickness their back plates the old fashioned way but want to have a go, this is the mantra:
  • Make sure the sole of the plane is flat
  • Keep your blade sharp and resharpen often
  • Set the blade to cut very fine shavings
  • Keep the mouth (of the plane) very tight.
For the back planing I used my Bevel-Up Smoother with a 50º blade. With the bed of the plane being 12º, this gave me an effective cutting angle of 62º, which was tough to drive but left me a flawless surface that allowed me to plane the plate in both directions to it's final dimension without any tear out or need for scraping or sanding. I have read a few places that pushing the plane at a skewed angle gives you a slicing action that is easier to push and facilitates a clean cut. While the ease of pushing is true, I found skewing the plane however, did have the opposite effect when it came to tearing the surface. I think the reason for this must lie in the fact that skewing the plane actually also decreased the effective cutting angle of the blade.

For me the key was to sharpen the blade often, keep it on a fine setting and drive it through the work in long even straight strokes. I think I resharpened three time during the process of taking the plate down 1-1.2mm. Most of the time I also overlapped the strokes by half a width, which decreased the sheer muscle needed, though with the blade freshly sharpened I couldn't resist temptation of trying to produce thin shaving in full width - probably a novelty value, but then again maybe not as it was so thrilling to see the plane spit out these fat curls on after the other.

The plates ended up with a with a final thickness of 2.0-2.1mm (~0.080-0.085"), thickest in the middle. Most books recommend 0.085-0.095" but since this guitar is going to be 11% smaller than a standard classical. I hope being on the thin side is appropriate.

PLANING THE BACK

CHECKING FINAL BACK THICKNESS

BACK SHAVINGS

MORE BACK SHAVINGS

FINISHED BACK WITH TEMPLATE


Friday, June 01, 2007

PREPARING THE BACK


PART 1.

I started work on the back on Tueday. I had already planed some of the saw marks out of it when I
did the resawing, but not all. It was getting on the thin side, about 3mm, and I wanted to have some stock to correct any misalignment errors that might occur during the gluing.

First the two halfs were clamped onto the shooting board and I ran the Jack plane over the edge a few times until it produced long curly shavings along the full length of the boards. Then plane was adjusted to a fine setting and shot it a few more strokes and held the two halfs butted together up against my 100W lights to examine the fit from top to bottom. But, like the soundboard, I ended up with a little belly in middle and light shining through at both ends.

I went back to the shooting board, clamped the back in again and started shaving off the middle only, slowly working my way out to the ends making the strokes longer and longer each time the blade stopped producing shavings. The light test was done again, and the whole procedure was repeated until no light came through the seam at all and a perfect fit was reached.

I don't know whether it was the hardness of the bubinga or the edge off the blade that wasn't as keen, but I had considerable more difficulties getting the desired fit on the back seam that I did with on the spruce top. I must have repeated the cycle at least ten times before a satisfactory result was reached.

The center strip was made from the fifth binding and purfling. I was somewhat confused trying to figure out how to go about the process of gluing it in. All of my books suggested to include it when gluing the back,
some all at once, some in stages, but none really elaborated on how to get the strip dead straight so it wouldn't ruin the center seam I'd just made such an effort to joint with utmost precision.

I ended up wedging the binding between the two unfinished sides and planed it freehand to final dimension, about 5.3 mm including the purfling already glued to it, checking the progress regularly with my calipers. It was very hard to get it dead even along the entire lenght, but I got it to be within ±0.05mm. I used both my block plane and my jack on very fine settings; The block plane with short strokes for the bigger irregularities and the Jack to even it all out with full strokes. I tried to keep the planes flat and steady by holding them so my fingers would function as guides against the bench (sides).

The Gluing was pretty straight forward. I used an MDF clamping caul wax paper to prevent the whole back getting glued to the jig and caul.

In retrospect I was wondering if it wouldn't have allowed for more accuracy if the binding had been glued on in two stages; First to one side of the jointed back and then to the other with the purfling added inbetween. This would have facilitated an opportunity to 'candle' the glued-on binding with the other back piece and making final adjustments if needed. However, I'm hoping this will all be of an academic nature as the back will receive the center joint reinforcement strip on the inside.


JOINTING THE BACK SEAM

'CANDLING' THE BACK SEAM
PLANING CENTERSTRIP TO DIMENSION

COMPONENTS READY FOR GLUING

TAPPING THE WEDGE CLAMPS

GLUING THE BACK WITH CENTER STRIP